Video Capture, Crop, and Trim
In this lesson we will capture a single shop video clip and trim it to set the entry and exit point. Video can be quite complicated, but newer software is making it more and more manageable all the time. There are many possible sources for a video: webcam, digital camcorder, analog camcorder. And these might be connected to a computer in a variety of ways: analog video capture card, video-in on your main video card, external video capture devices (Dazzle), s-video, USB or Firewire connection. We will be using a Firewire connection (IEEE-1394) to a digital camcorder capture a video signal in digital format, but we will explore some of the other options as we go. Two programs available on our system can use this remotely control a digital camcorder through a Firewire connection and capture video, the Windows Movie Maker and Adobe Premiere (or Premiere Elements) . We will be using Premiere first and looking at Movie Maker later.
An analog video signal can come from any of several locations (video camera, videotape recorder, DVD) and enter most video capture devices through its RCA or S-Video ports.
RCA ports S-Video port
RCA cables are common in audio and video equipment. Don't forget to make audio as well as video connections and to plug in your speakers ;-)
Other common connections use the following size plugs:
Stereo mini-plug
Mono mini-plug
1/4 inch stereo plug
A Firewire connection or DV in/out (digital video) is a high speed digital link that lets a computer communicate in both directions with a digital camera. It can do many other things as well, but we're only interested in its use for digital cameras for the moment. It will allow you to move the videeo and audio back and forth between the machines and also control one machine from the other. The two ends of the cable are different. The four-pin connector attaches to the camera, and the six-pin connector plugs into the computer. (Though some computers may have a 4-pin Firewire connector.)
Your camera may also have a USB cable and this may or may not work for video transfer. Some video cameras use USB to transfer only still photos.
A typical Firewire (IEEE-1394) card for a PC with 6-pin connectors
A digital camcorder stores its video and audio in digital format on a tape or disk. Analog cameras store the signal in a format that is more like a TV signal. Copies of a digital video file are exact duplicates, but copies of an analog signal always show some degradation.
Capturing Video in Premiere
Adobe Premiere is a very powerful and expensive program, and like all very powerful programs, there are a LOT of possible settings that can lead to confusion. We will see that Windows Movie Maker, though capable of doing much less, is much easier to use.
All work in Premiere must be done in a project. The first thing you need to do after launching Premiere is to create a new project. If you are not sure what size to use, you can select a general purpose preset mode: Presentation 160x120. A project window will appear. This is where individual video clips for the project will be kept.
Assuming that the video camera is properly set up and turned on, cables are connected to the Video In or S-Video port, or DV in/out for a digital Firewire connection, and a microphone is connected to the microphone in jack, we are ready to roll. Test all equipment to verify light intensity, focus, background, and sound level. Then do a short test to be sure that the video capture board is working.
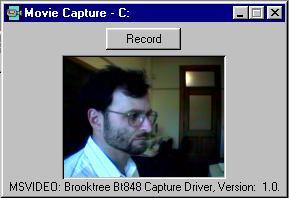
Select the Premiere menu item File / Capture / Movie Capture. Right click on the capture window, and select Capture File... to use a preallocated file in the root directory. This will tend to be more efficient because you will use the same file each time, but you could also use a new file each time if you prefer. The latter solution could create problems if memory is low or the disk fragmented. Make sure that the size of any preallocated file is sufficient. If you have enough RAM, it is even more efficient to Capture to Memory.
Right click on the capture window again to select the Video Source. depending on whether you are using RCA Video or S-Video inputs. You may also need to adjust brightness and contrast here. At this point you should see the video image in the capture window. If you are capturing from recorded tape, you will see the video after you press Play on your VCR.
The Video and Audio Recording Options that you select will depend on the environment in which the final product will appear. Check out your display software and hardware to be aware of any limitations or recommendations.
Right click on the capture window and select Record Audio. Under Audio Recording Options, select 8/16 bits and sample rate depending on your needs. For a test file you may use 16-bit, 11kHz.
Right click on the capture window and select Recording Options. Choose a frame rate (we will use 15 frames per second (fps). Under Video Format, select the image that you wish. You may also have to select a compressioin option depending on the video capture board. We will use no recompression. In some instances, further processing may require uncompressed video input.
When ready, press Record 1/2 second before you wish to begin. Click again when recording is done. Give your clip a name when saving it via the menu item File / Save.
Setting IN and OUT points
When viewing your clip in the Clip Window, you can trim the final product by setting the In and Out points. Use the sliding controls in the lower left hand cortner of the clip window to find the frame where you want the clip to begin. Set the In point by clicking on the In button in the lower right portion of the clip window. To set the Out point, find the frame where you want the clip to stop and click the Out button. The words In and Out will appear above the video when the In and Out frames are viewed in the clip window.
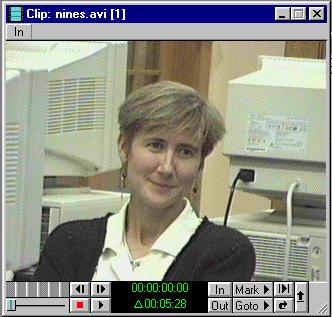
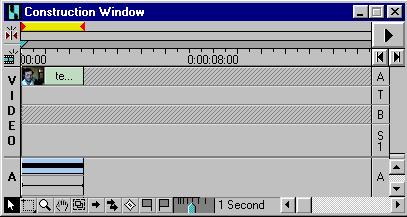
Drag the clip to the Project Window so it will be available for future use in this project. Then open the Construction Window by selecting Window / Construction.
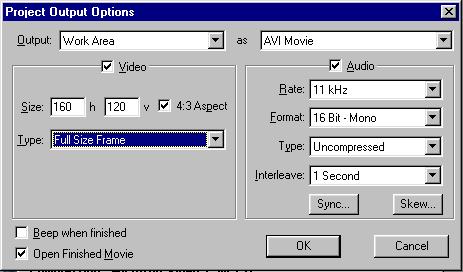
Select Make / Make Movie then give it a name and choose Output Options
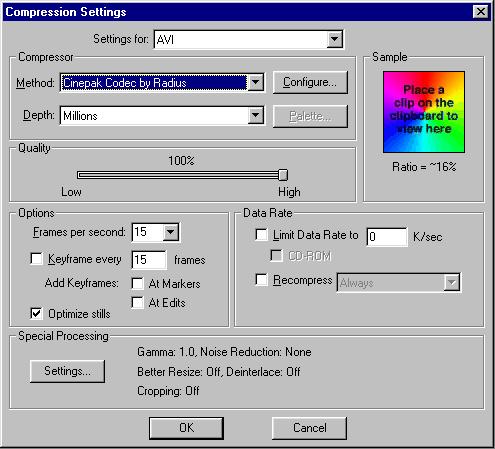
and Compression settings.
Using your digital still camera
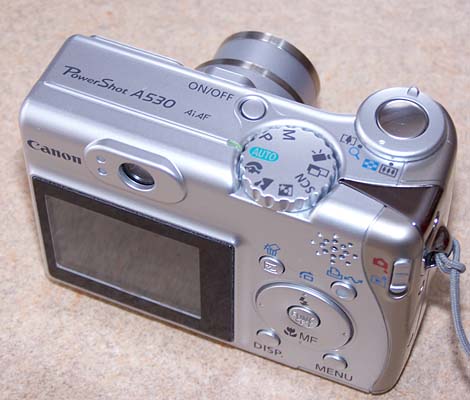
Most of today's digital still cameras have a video setting. You can film short clips and download them to your computer just as you do your images. because of their small size, stability tends to be difficult to control when trying to hold these cameras cameras still for video. It's even harder if you try to pan or zoom. A tripod or other stable surface can help keep the camera steady.
Keep in mind that your editing and use of any video that you generate will be simpler if you use the same resolution (width by height) for all of your shots. Plan ahead and shoot all of your video in the size that you will be using in your final product.
http://web.cortland.edu/flteach/mm-course/vid-cap.html
Video Capture Cards
Elgato Game Capture HD PlayStation 3/Xbox 360 Recorder for Mac/PC up to 1080P (10025010)
This is one of the best capture cards I have seen and used. The setup is very easy, thanks to HDMI, and they include every cable you will need. Just connect it to your PC, download the software, and you are up and running. It's that easy. The quality of the video in 1080p is superb, just as if it was on your TV. The pass-through feature on the capture device is great, so you don't have to have your computer on all the time.
I ordered El Gato so my 10-year-old son could record various games from his X-box 360. Out of the box, the device was very easy to set up. It required a software download for our MacBook Air, but once that was done, it was just a few simple connections and we were ready to record. It's a very small device that doesn't need a power cable. I truly can't say enough good things about the product. It functions exactly as promised and was a breeze to set up.
Read More Customer Reviews Here
Product Description Elgato Game Capture HD enables you to record PlayStation or Xbox game play to a Mac or PC and share it with your friends and fans. With advanced hardware H.264 encoding, you can capture in stunning HD quality, while keeping the file size low. The game play is passed through to the TV via HDMI - in pristine quality, without delay. Elgato Game Capture HD doesn't need a lot of cables or even a power supply to record your game: With direct Xbox 360 and PlayStation 3 input, you can use a single cable to connect it to your console. The included software makes it easy to capture every move you make, even if you forget to press the record button: The unique Flashback Recording feature lets you time shift your game play, so that you can simply slide back in time on your Mac or PC and hit the record button retroactively. With one click, you can share your game play with your friends and fans on YouTube, Facebook and Twitter. Even better, the tailor-made Elgato Game Capture HD software allows you to quickly trim your gaming scenes and pass them on to your favorite editing software. Ships with: Elgato Game Capture HD, Quick Start Guide, USB cable, HDMI cable and PlayStation 3 cable.
Product Features
• Uses H.264 encoding to capture your game play in stunning HD
• Using Xbox 360 and PlayStation 3 input, a single cable is all that is needed to connect to your console
• Flashback recording lets you time shift your game play so you can simply slide back in time on your Mac or PC and hit the record button retroactively
• With one click you can share your game play with your friends and fans on YouTube, Facebook and Twitter
• PC: Windows 7, 2.0 GHz dual core CPU, sound card
• Supported resolutions: 480p, 576p, 720p, 1080i, 1080p
Price : Click here
Hauppauge 1445 HD-PVR Gaming Edition High Definition Personal Video Recorder for Use with PC, PS3, Xbox 360, and Wii
This is exactly what I was looking for. I needed a way to move my saved HD videos from DishNet drives to my PC, hopefully keeping the 5:1 sound. When I got the gadget made my connections, component for video and optical for audio and installed the software. After 5 - 10 minutes I was importing my video, and the quality is just as beautiful as the original (1080i), got my 5:1 sound, too and life is good. Your videos are then playable in HD as is or you can convert to different formats (iPhone4, PSP, you name it), or you can use the HD video and burn to DVD(R...BD..)..on first look it appears that 30 min of HD will take about 2 gigs..but you can twick the settings to your needs. Just remember that even the DVD(R or DL) are in BD format, so you will need a BD Player to play them. This is all I wanted and more! Software is very simple to use, to learning curve needed... you will be fully using it in minutes. Excellent!
I bought this PVR for my youtube channel. I needed an HD recorder for my Xbox 360. Setting it up was simple. I downloaded 'HDPVR Capture' for my Mac and I was recording my gameplay in a snap. The quality is great. I am very pleased. It was a little bit pricey, but if you want to play and capture in hi def, this is a great way to go. You can see a sample of my recordings - just search 'only use knife' on youtube. IceViper777 is my channel.
HD-PVR Gaming Edition is a high definition (HD) video recorder for Gaming Consoles and PCs. It records video in an H.264 Blu-ray compatible format to your PC from any component video equipped Game Console with component out, like Xbox360, PlayStation 3 and Wii. This Gaming Edition includes a 3 in 1 component cable for use with the Xbox 360, PS3 and Wii. This cable is a $30 value. In addition, it will record from HD cable TV and Satellite set top boxes. The HD PVR records at video resolutions up to 1080i in real time using a built-in hardware H.264 encoder. Audio is recorded using AAC or Dolby Digital. Compatible with Windows 7, Vista and Windows XP with Service pack 2.
Technical Details
Style: With Gaming Console Cables
• High definition (HD) video recorder for Gaming Consoles and PCs
• Records video in an H.264 Blu-ray compatible format to your PC
• Includes a 3 in 1 component cable for use with the Xbox 360, PS3 and Wii
• Compatible with Windows 7, Vista and Windows XP with Service pack 2
• Record: Xbox, Xbox 360, PS3 and Game Play
I bought this PVR for my youtube channel. I needed an HD recorder for my Xbox 360. Setting it up was simple. I downloaded 'HDPVR Capture' for my Mac and I was recording my gameplay in a snap. The quality is great. I am very pleased. It was a little bit pricey, but if you want to play and capture in hi def, this is a great way to go. You can see a sample of my recordings - just search 'only use knife' on youtube. IceViper777 is my channel.
Read More Customer Reviews Here
HD-PVR Gaming Edition is a high definition (HD) video recorder for Gaming Consoles and PCs. It records video in an H.264 Blu-ray compatible format to your PC from any component video equipped Game Console with component out, like Xbox360, PlayStation 3 and Wii. This Gaming Edition includes a 3 in 1 component cable for use with the Xbox 360, PS3 and Wii. This cable is a $30 value. In addition, it will record from HD cable TV and Satellite set top boxes. The HD PVR records at video resolutions up to 1080i in real time using a built-in hardware H.264 encoder. Audio is recorded using AAC or Dolby Digital. Compatible with Windows 7, Vista and Windows XP with Service pack 2.
Technical Details
Style: With Gaming Console Cables
• High definition (HD) video recorder for Gaming Consoles and PCs
• Records video in an H.264 Blu-ray compatible format to your PC
• Includes a 3 in 1 component cable for use with the Xbox 360, PS3 and Wii
• Compatible with Windows 7, Vista and Windows XP with Service pack 2
• Record: Xbox, Xbox 360, PS3 and Game Play
Price : Click here
Subscribe to:
Posts (Atom)